摘自 Creating a single master cluster with kubeadm | kubernetes.io,更新中…
kubeadm 是 Kubernetes 官方提供的一个 CLI (Command Line Interface) 工具,可以很方便的搭建一套符合官方最佳实践的最小化可用集群。当我们使用kubeadm搭建集群时,集群可以通过 K8S 的一致性测试,并且kubeadm还支持其他的集群生命周期功能,比如升级/降级等。
1. 前期准备
安装kubeadm前需要在所有节点上检查以下条件是否满足。
1.1 系统与硬件
部署集群的所有节点主机需运行以下操作系统:
- Ubuntu 16.04+
- Debian 9
- CentOS 7
- RHEL 7
- Fedora 25/26 (best-effort)
- HypriotOS v1.0.1+
- Container Linux (tested with 1800.6.0)
CPU 2 核以上,内存 2 GB 以上。
1.2 节点之间网络互通
节点之间需要具备Full network connectivity,公网、局域网均可。
1.3 各不相同的 hostname、MAC 地址
通过hostname查看主机名,通过ip link或ifconfig -a查看网卡对应的 MAC 地址,确保每台机器各不相同。
1.4 各不相同的 product_uuid
通过sudo cat /sys/class/dmi/id/product_uuid可查看机器的product_uuid,确保要搭建集群的所有节点的product_uuid均不相同。
这样做的原因是每个 Node 都有一些信息会被记录进集群内,而此处我们需要保证的这些唯一的信息,便会记录在集群的
nodeInfo中,比如product_uuid在集群内以systemUUID来表示,具体信息则可以通过集群的API Server获取到。
1.5 禁用 swap 交换内存
Kubernetes 集群的每个节点上都有个必需的组件kubelet。从Kubernetes 1.8开始,启动kubelet时需要禁用swap,或者需要更改kubelet的启动参数为--fail-swap-on=false。
摘自《Kubernetes 从上手到实践》:
虽说可以更改参数让其可用,但是我建议还是禁用 swap 除非你的集群有特殊的需求,比如:有大内存使用的需求,但又想节约成本;或者你知道你将要做什么,否则可能会出现一些非预期的情况,尤其是做了内存限制的时候,当某个 Pod 达到内存限制的时候,它可能会溢出到 swap 中,这会导致 k8s 无法正常进行调度。
禁用方法如下:
1.使用cat /proc/swaps验证swap配置的设备和文件:
~> cat /proc/swaps
Filename                Type        Size    Used    Priority
/dev/dm-1                               partition    8126460    0    -1

~> free -h
              total        used        free      shared  buff/cache   available
Mem:           7.6G        996M        4.5G         12M        2.2G        6.3G
Swap:          7.7G          0B        7.7G

~> cat /etc/fstab
#
# /etc/fstab
# Created by anaconda on Tue Nov 13 11:26:56 2018
#
# Accessible filesystems, by reference, are maintained under '/dev/disk'
# See man pages fstab(5), findfs(8), mount(8) and/or blkid(8) for more info
#
/dev/mapper/centos-root /                       xfs     defaults        0 0
UUID=aadb6c2e-8a99-46e5-b208-1eaee9944490 /boot                   xfs     defaults        0 0
UUID=4797-AB7E          /boot/efi               vfat    umask=0077,shortname=winnt 0 0
/dev/mapper/centos-home /home                   xfs     defaults        0 0
/dev/mapper/centos-swap swap                    swap    defaults        0 0

~> lsblk
NAME            MAJ:MIN RM   SIZE RO TYPE MOUNTPOINT
sda               8:0    0 931.5G  0 disk
├─sda1            8:1    0   200M  0 part /boot/efi
├─sda2            8:2    0     1G  0 part /boot
└─sda3            8:3    0 930.3G  0 part
  ├─centos-root 253:0    0   500G  0 lvm  /
  ├─centos-swap 253:1    0   7.8G  0 lvm  [SWAP]
  └─centos-home 253:2    0 422.6G  0 lvm  /home
sr0              11:0    1  1024M  0 rom
2.使用swapoff -a禁用/etc/fstab中的所有交换区:
使用
swapon -a即可重新启用/etc/fstab中的所有交换区。
~> swapoff -a
~> cat /proc/swaps
Filename                Type        Size    Used    Priority

~> free -h
              total        used        free      shared  buff/cache   available
Mem:           7.6G        989M        4.5G         12M        2.2G        6.3G
Swap:            0B          0B          0B

~> lsblk
NAME            MAJ:MIN RM   SIZE RO TYPE MOUNTPOINT
sda               8:0    0 931.5G  0 disk
├─sda1            8:1    0   200M  0 part /boot/efi
├─sda2            8:2    0     1G  0 part /boot
└─sda3            8:3    0 930.3G  0 part
  ├─centos-root 253:0    0   500G  0 lvm  /
  ├─centos-swap 253:1    0   7.8G  0 lvm
  └─centos-home 253:2    0 422.6G  0 lvm  /home
sr0              11:0    1  1024M  0 rom
可以看到swap分区的挂载点已被卸载。
3.为了确保机器重启或重挂载时,不会再次挂载swap分区,还需将/etc/fstab中的swap分区记录注释掉:
~> vim /etc/fstab
#
# /etc/fstab
# Created by anaconda on Tue Nov 13 11:26:56 2018
#
# Accessible filesystems, by reference, are maintained under '/dev/disk'
# See man pages fstab(5), findfs(8), mount(8) and/or blkid(8) for more info
#
/dev/mapper/centos-root /                       xfs     defaults        0 0
UUID=aadb6c2e-8a99-46e5-b208-1eaee9944490 /boot                   xfs     defaults        0 0
UUID=4797-AB7E          /boot/efi               vfat    umask=0077,shortname=winnt 0 0
/dev/mapper/centos-home /home                   xfs     defaults        0 0
# /dev/mapper/centos-swap swap                    swap    defaults        0 0
1.6 查看端口占用情况
Kubernetes 是 C/S 架构,在启动后会固定监听以下端口用于提供服务。
Master node(s):
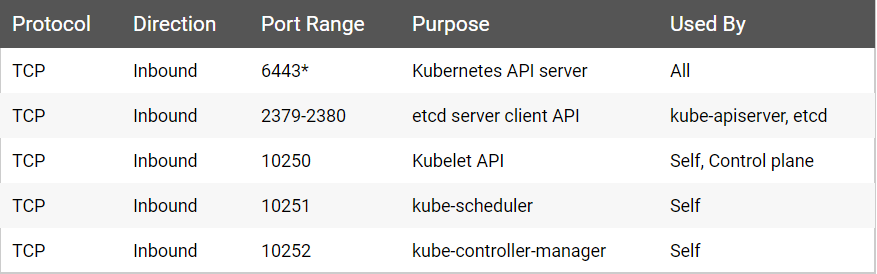
Worker node(s):

可以通过sudo netstat -ntlp |grep -E '6443|23[79,80]|1025[0,1,2]'查看Master端口是否被占用。如果被占用,请手动释放。
若提示
command not found,则需要先安装netstat
CentOS:sudo yum install net-tools
Debian/Ubuntu:sudo apt install net-tools
1.7 容器运行时
需要在所有节点上安装容器运行时(Container Runtime),默认为 Docker。可参考 CentOS 7 安装 Docker CE | 苏易北。
1.8 我的集群主机
| Role | Hostname | OS | CPU | RAM |
|---|---|---|---|---|
| Master | abelsu7-ubuntu | Ubuntu 18.04 | i7-6700 @ 3.40 GHz,4 核 8 线程 | 32 GB |
| Worker | centos-1 | CentOS 7.5 | i5-4590 @ 3.30 GHz,4 核 4 线程 | 4 GB |
| Worker | centos-2 | CentOS 7.5 | i5-4590 @ 3.30 GHz,4 核 4 线程 | 8 GB |
2. 安装 kubeadm、kubelet、kubectl
注:国内用户安装以上组件时可能会遇到
众所周知的网络问题。我是用代理解决的,可参考 Linux 下使用 SSR + ProxyChains 代理终端流量 | 苏易北
- kubeadm:用于初始化集群并对其进行管理
- kubelet:在集群中所有机器上运行的组件,负责执行诸如启动 Pod 和容器之类的操作
- kubectl:与集群通信的命令行工具
Ubuntu, Debian or HypriotOS:
apt-get update && apt-get install -y apt-transport-https curl
curl -s https://packages.cloud.google.com/apt/doc/apt-key.gpg | apt-key add -
cat <<EOF >/etc/apt/sources.list.d/kubernetes.list
deb https://apt.kubernetes.io/ kubernetes-xenial main
EOF
apt-get update
apt-get install -y kubelet kubeadm kubectl
apt-mark hold kubelet kubeadm kubectl
CentOS, RHEL or Fedora:
cat <<EOF > /etc/yum.repos.d/kubernetes.repo
[kubernetes]
name=Kubernetes
baseurl=https://packages.cloud.google.com/yum/repos/kubernetes-el7-x86_64
enabled=1
gpgcheck=1
repo_gpgcheck=1
gpgkey=https://packages.cloud.google.com/yum/doc/yum-key.gpg https://packages.cloud.google.com/yum/doc/rpm-package-key.gpg
exclude=kube*
EOF

# Set SELinux in permissive mode (effectively disabling it)
setenforce 0
sed -i 's/^SELINUX=enforcing$/SELINUX=permissive/' /etc/selinux/config

yum install -y kubelet kubeadm kubectl --disableexcludes=kubernetes

systemctl enable --now kubelet
安装完成后验证版本信息,可以看到此处安装的版本均为v1.13.3:
~> kubeadm version
kubeadm version: &version.Info{Major:"1", Minor:"13", GitVersion:"v1.13.3", GitCommit:"721bfa751924da8d1680787490c54b9179b1fed0", GitTreeState:"clean", BuildDate:"2019-02-01T20:05:53Z", GoVersion:"go1.11.5", Compiler:"gc", Platform:"linux/amd64"}

~> kubectl version --client
Client Version: version.Info{Major:"1", Minor:"13", GitVersion:"v1.13.3", GitCommit:"721bfa751924da8d1680787490c54b9179b1fed0", GitTreeState:"clean", BuildDate:"2019-02-01T20:08:12Z", GoVersion:"go1.11.5", Compiler:"gc", Platform:"linux/amd64"}

~> kubelet --version
Kubernetes v1.13.3
3. 配置 kubelet
为了在生产环境中保障各组件的稳定运行,同时也为了便于管理,我们增加对kubelet的systemd的配置,由systemd对服务进行管理:
首先创建/etc/systemd/system/kubelet.service(若文件已存在则继续下一步),并输入以下内容:
[Unit]
Description=kubelet: The Kubernetes Node Agent
Documentation=https://kubernetes.io/docs/

[Service]
ExecStart=/usr/bin/kubelet
Restart=always
StartLimitInterval=0
RestartSec=10

[Install]
WantedBy=multi-user.target
之后创建/etc/systemd/system/kubelet.service.d/kubeadm.conf(若文件已存在则继续下一步),并输入以下内容:
# Note: This dropin only works with kubeadm and kubelet v1.11+
[Service]
Environment="KUBELET_KUBECONFIG_ARGS=--bootstrap-kubeconfig=/etc/kubernetes/bootstrap-kubelet.conf --kubeconfig=/etc/kubernetes/kubelet.conf"
Environment="KUBELET_CONFIG_ARGS=--config=/var/lib/kubelet/config.yaml"
# This is a file that "kubeadm init" and "kubeadm join" generates at runtime, populating the KUBELET_KUBEADM_ARGS variable dynamically
EnvironmentFile=-/var/lib/kubelet/kubeadm-flags.env
# This is a file that the user can use for overrides of the kubelet args as a last resort. Preferably, the user should use
# the .NodeRegistration.KubeletExtraArgs object in the configuration files instead. KUBELET_EXTRA_ARGS should be sourced from this file.
EnvironmentFile=-/etc/sysconfig/kubelet
ExecStart=
ExecStart=/usr/bin/kubelet $KUBELET_KUBECONFIG_ARGS $KUBELET_CONFIG_ARGS $KUBELET_KUBEADM_ARGS $KUBELET_EXTRA_ARGS
最后使用systemctl enable kubelet启用服务:
~> systemctl enable kubelet
Created symlink from /etc/systemd/system/multi-user.target.wants/kubelet.service to /etc/systemd/system/kubelet.service.
4. 使用 kubeadm 启动集群
4.1 提前下载所需镜像
使用kubeadm init首次创建集群时会从k8s.gcr.io这个 Registry 下载 Kubernetes 所需的 Docker 镜像。
由于众所周知的网络问题,即使我挂了代理也无法成功下载。好在阿里云上有同步镜像的组件,所以可以提前从阿里云上下载所需镜像,再重新docker tag上k8s.gcr.io这个 Registry。
注:可以参考以下三篇文章:
首先需要使用kubeadm config image list查看所需镜像的版本:
~> kubeadm config images list
k8s.gcr.io/kube-apiserver:v1.13.3
k8s.gcr.io/kube-controller-manager:v1.13.3
k8s.gcr.io/kube-scheduler:v1.13.3
k8s.gcr.io/kube-proxy:v1.13.3
k8s.gcr.io/pause:3.1
k8s.gcr.io/etcd:3.2.24
k8s.gcr.io/coredns:1.2.6
之后新建脚本文件docker-k8s-images.sh,输入以下内容:
#!/bin/bash

images=(
    kube-apiserver:v1.13.3
    kube-controller-manager:v1.13.3
    kube-scheduler:v1.13.3
    kube-proxy:v1.13.3
    pause:3.1
    etcd:3.2.24
    coredns:1.2.6
)

for imageName in ${images[@]} ; do
    docker pull registry.cn-hangzhou.aliyuncs.com/google_containers/${imageName}
    docker tag registry.cn-hangzhou.aliyuncs.com/google_containers/${imageName} k8s.gcr.io/${imageName}
    docker rmi registry.cn-hangzhou.aliyuncs.com/google_containers/${imageName}
done

docker images
阿里云镜像仓库地址:
registry.cn-hangzhou.aliyuncs.comregistry.aliyuncs.com
最后添加执行权限,运行脚本:
~> chmod +x ./docker-k8s-images.sh
~> ./docker-k8s-images.sh
...
REPOSITORY                           TAG                 IMAGE ID            CREATED             SIZE
k8s.gcr.io/kube-apiserver            v1.13.3             fe242e556a99        3 weeks ago         181MB
k8s.gcr.io/kube-proxy                v1.13.3             98db19758ad4        3 weeks ago         80.3MB
k8s.gcr.io/kube-controller-manager   v1.13.3             0482f6400933        3 weeks ago         146MB
k8s.gcr.io/kube-scheduler            v1.13.3             3a6f709e97a0        3 weeks ago         79.6MB
k8s.gcr.io/coredns                   1.2.6               f59dcacceff4        3 months ago        40MB
k8s.gcr.io/etcd                      3.2.24              3cab8e1b9802        5 months ago        220MB
k8s.gcr.io/pause                     3.1                 da86e6ba6ca1        14 months ago       742kB
...
4.2 配置 Pod 网络插件 flannel
在使用kubeadm init启动集群时,需要传递--pod-network-cidr参数以便 Pod 之间可以相互通信。
关于网络的选择,此处不做过多介绍,暂时选择一个被广泛使用的方案flannel,这时需要指定--pod-network-cidr=10.244.0.0/16。
另外,在使用flannel之前,还需查看/proc/sys/net/bridge/bridge-nf-call-iptables是否已设置为1:
~> sysctl net.bridge.bridge-nf-call-iptables
net.bridge.bridge-nf-call-iptables = 1
否则可以通过sysctl net.bridge.bridge-nf-call-iptables=1更改设置。
Notes: Set
/proc/sys/net/bridge/bridge-nf-call-iptablesto1by runningsysctl net.bridge.bridge-nf-call-iptables=1to pass bridged IPv4 traffic to iptables’ chains. This is a requirement for some CNI plugins to work, for more information please see here.
最后,对于Kubernetes v1.7+之后的版本,记得在下一节的kubeadm init --pod-network-cidr=10.244.0.0/16命令执行之后,应用flannel的配置文件:
kubectl apply -f https://raw.githubusercontent.com/coreos/flannel/master/Documentation/kube-flannel.yml
有关
flannel的更多信息,请查看 the CoreOS flannel repository on GitHub
4.3 初始化集群 kubeadm init
所有的准备工作已经完成,现在开始创建一个 k8s 集群。
首先使用kubeadm init初始化集群,并传递--pod-network-cidr=10.244.0.0/16参数以指定 Pod 网络方案为flannel:
~> kubeadm init --pod-network-cidr=10.244.0.0/16

[init] Using Kubernetes version: v1.13.3
[preflight] Running pre-flight checks
[preflight] Pulling images required for setting up a Kubernetes cluster
[preflight] This might take a minute or two, depending on the speed of your internet connection
[preflight] You can also perform this action in beforehand using 'kubeadm config images pull'
[kubelet-start] Writing kubelet environment file with flags to file "/var/lib/kubelet/kubeadm-flags.env"
[kubelet-start] Writing kubelet configuration to file "/var/lib/kubelet/config.yaml"
[kubelet-start] Activating the kubelet service
[certs] Using certificateDir folder "/etc/kubernetes/pki"
[certs] Generating "front-proxy-ca" certificate and key
[certs] Generating "front-proxy-client" certificate and key
[certs] Generating "etcd/ca" certificate and key
[certs] Generating "etcd/healthcheck-client" certificate and key
[certs] Generating "apiserver-etcd-client" certificate and key
[certs] Generating "etcd/server" certificate and key
[certs] etcd/server serving cert is signed for DNS names [abelsu7-ubuntu localhost] and IPs [222.201.139.151 127.0.0.1 ::1]
[certs] Generating "etcd/peer" certificate and key
[certs] etcd/peer serving cert is signed for DNS names [abelsu7-ubuntu localhost] and IPs [222.201.139.151 127.0.0.1 ::1]
[certs] Generating "ca" certificate and key
[certs] Generating "apiserver" certificate and key
[certs] apiserver serving cert is signed for DNS names [abelsu7-ubuntu kubernetes kubernetes.default kubernetes.default.svc kubernetes.default.svc.cluster.local] and IPs [10.96.0.1 222.201.139.151]
[certs] Generating "apiserver-kubelet-client" certificate and key
[certs] Generating "sa" key and public key
[kubeconfig] Using kubeconfig folder "/etc/kubernetes"
[kubeconfig] Writing "admin.conf" kubeconfig file
[kubeconfig] Writing "kubelet.conf" kubeconfig file
[kubeconfig] Writing "controller-manager.conf" kubeconfig file
[kubeconfig] Writing "scheduler.conf" kubeconfig file
[control-plane] Using manifest folder "/etc/kubernetes/manifests"
[control-plane] Creating static Pod manifest for "kube-apiserver"
[control-plane] Creating static Pod manifest for "kube-controller-manager"
[control-plane] Creating static Pod manifest for "kube-scheduler"
[etcd] Creating static Pod manifest for local etcd in "/etc/kubernetes/manifests"
[wait-control-plane] Waiting for the kubelet to boot up the control plane as static Pods from directory "/etc/kubernetes/manifests". This can take up to 4m0s
[apiclient] All control plane components are healthy after 23.002540 seconds
[uploadconfig] storing the configuration used in ConfigMap "kubeadm-config" in the "kube-system" Namespace
[kubelet] Creating a ConfigMap "kubelet-config-1.13" in namespace kube-system with the configuration for the kubelets in the cluster
[patchnode] Uploading the CRI Socket information "/var/run/dockershim.sock" to the Node API object "abelsu7-ubuntu" as an annotation
[mark-control-plane] Marking the node abelsu7-ubuntu as control-plane by adding the label "node-role.kubernetes.io/master=''"
[mark-control-plane] Marking the node abelsu7-ubuntu as control-plane by adding the taints [node-role.kubernetes.io/master:NoSchedule]
[bootstrap-token] Using token: ar8quq.bx68gpg2ktjzagk8
[bootstrap-token] Configuring bootstrap tokens, cluster-info ConfigMap, RBAC Roles
[bootstraptoken] configured RBAC rules to allow Node Bootstrap tokens to post CSRs in order for nodes to get long term certificate credentials
[bootstraptoken] configured RBAC rules to allow the csrapprover controller automatically approve CSRs from a Node Bootstrap Token
[bootstraptoken] configured RBAC rules to allow certificate rotation for all node client certificates in the cluster
[bootstraptoken] creating the "cluster-info" ConfigMap in the "kube-public" namespace
[addons] Applied essential addon: CoreDNS
[addons] Applied essential addon: kube-proxy

Your Kubernetes master has initialized successfully!

To start using your cluster, you need to run the following as a regular user:

  mkdir -p $HOME/.kube
  sudo cp -i /etc/kubernetes/admin.conf $HOME/.kube/config
  sudo chown $(id -u):$(id -g) $HOME/.kube/config

You should now deploy a pod network to the cluster.
Run "kubectl apply -f [podnetwork].yaml" with one of the options listed at:
  https://kubernetes.io/docs/concepts/cluster-administration/addons/

You can now join any number of machines by running the following on each node
as root:

  kubeadm join 222.201.139.151:6443 --token ar8quq.bx68gpg2ktjzagk8 --discovery-token-ca-cert-hash sha256:125083b871f062c8d4c0c7ab5cefee1ba0b74a6b3fb17c0c4b5ba4d591c1051d
根据提示,使用以下命令配置kubectl:
~> mkdir -p $HOME/.kube
~> sudo cp -i /etc/kubernetes/admin.conf $HOME/.kube/config
~> sudo chown $(id -u):$(id -g) $HOME/.kube/config
最后,应用flannel配置文件:
~> kubectl apply -f https://raw.githubusercontent.com/coreos/flannel/master/Documentation/kube-flannel.yml

podsecuritypolicy.extensions/psp.flannel.unprivileged created
clusterrole.rbac.authorization.k8s.io/flannel created
clusterrolebinding.rbac.authorization.k8s.io/flannel created
serviceaccount/flannel created
configmap/kube-flannel-cfg created

daemonset.extensions/kube-flannel-ds-amd64 created
daemonset.extensions/kube-flannel-ds-arm64 created
daemonset.extensions/kube-flannel-ds-arm created
daemonset.extensions/kube-flannel-ds-ppc64le created
daemonset.extensions/kube-flannel-ds-s390x created
稍等片刻,master即处于Ready状态。可在其他机器上输入以下命令加入集群:
kubeadm join 222.201.139.151:6443 --token ar8quq.bx68gpg2ktjzagk8 --discovery-token-ca-cert-hash sha256:125083b871f062c8d4c0c7ab5cefee1ba0b74a6b3fb17c0c4b5ba4d591c1051d
4.4 查看集群节点状态
可通过kubectl查看集群节点状态:
~> kubectl cluster-info
Kubernetes master is running at https://222.201.139.151:6443
KubeDNS is running at https://222.201.139.151:6443/api/v1/namespaces/kube-system/services/kube-dns:dns/proxy


To further debug and diagnose cluster problems, use 'kubectl cluster-info dump'.

~> kubectl get nodes
NAME             STATUS   ROLES    AGE   VERSION
abelsu7-ubuntu   Ready    master   15m   v1.13.3
可以看到master已经处于Ready状态。
4.5 查看集群 Pod 状态
我们知道 Kubernetes 中的最小调度单元是Pod。使用以下命令查看集群中现有的Pod状态:
~> kubectl get pods --all-namespaces
NAMESPACE     NAME                                     READY   STATUS    RESTARTS   AGE
kube-system   coredns-86c58d9df4-9vwct                 1/1     Running   0          19m
kube-system   coredns-86c58d9df4-mvdnh                 1/1     Running   0          19m
kube-system   etcd-abelsu7-ubuntu                      1/1     Running   0          18m
kube-system   kube-apiserver-abelsu7-ubuntu            1/1     Running   0          18m
kube-system   kube-controller-manager-abelsu7-ubuntu   1/1     Running   0          18m
kube-system   kube-flannel-ds-amd64-wktkk              1/1     Running   0          17m
kube-system   kube-proxy-qv2t8                         1/1     Running   0          19m
kube-system   kube-scheduler-abelsu7-ubuntu            1/1     Running   0          18m
5. 向集群中添加节点
根据刚才执行完kubeadm init后给出的提示信息,分别在新机器centos-1和centos-2上执行kubeadm join命令:
~> kubeadm join 222.201.139.151:6443 --token ar8quq.bx68gpg2ktjzagk8 --discovery-token-ca-cert-hash sha256:125083b871f062c8d4c0c7ab5cefee1ba0b74a6b3fb17c0c4b5ba4d591c1051d

[preflight] Running pre-flight checks
    [WARNING Service-Docker]: docker service is not enabled, please run 'systemctl enable docker.service'
    [WARNING SystemVerification]: this Docker version is not on the list of validated versions: 18.09.2. Latest validated version: 18.06
    [WARNING Hostname]: hostname "centos-1" could not be reached
    [WARNING Hostname]: hostname "centos-1": lookup centos-1 on 222.201.130.30:53: no such host
[discovery] Trying to connect to API Server "222.201.139.151:6443"
[discovery] Created cluster-info discovery client, requesting info from "https://222.201.139.151:6443"
[discovery] Requesting info from "https://222.201.139.151:6443" again to validate TLS against the pinned public key
[discovery] Cluster info signature and contents are valid and TLS certificate validates against pinned roots, will use API Server "222.201.139.151:6443"
[discovery] Successfully established connection with API Server "222.201.139.151:6443"
[join] Reading configuration from the cluster...
[join] FYI: You can look at this config file with 'kubectl -n kube-system get cm kubeadm-config -oyaml'
[kubelet] Downloading configuration for the kubelet from the "kubelet-config-1.13" ConfigMap in the kube-system namespace
[kubelet-start] Writing kubelet configuration to file "/var/lib/kubelet/config.yaml"
[kubelet-start] Writing kubelet environment file with flags to file "/var/lib/kubelet/kubeadm-flags.env"
[kubelet-start] Activating the kubelet service
[tlsbootstrap] Waiting for the kubelet to perform the TLS Bootstrap...
[patchnode] Uploading the CRI Socket information "/var/run/dockershim.sock" to the Node API object "centos-1" as an annotation

This node has joined the cluster:
* Certificate signing request was sent to apiserver and a response was received.
* The Kubelet was informed of the new secure connection details.

Run 'kubectl get nodes' on the master to see this node join the cluster.
上述命令执行完成后,提示已经成功加入集群。
此时,在master上查看当前集群状态:
~> kubectl get nodes
NAME             STATUS   ROLES    AGE   VERSION
abelsu7-ubuntu   Ready    master   26m   v1.13.3
centos-1         Ready    <none>   24m   v1.13.3
centos-2         Ready    <none>   16m   v1.13.3
待更新
journalctl -f -u kubelet
kubeadm reset
cat /var/lib/kubelet/kubeadm-flags.env
kubectl get pods --all-namespaces
kubectl describe pod kube-flannel-ds-amd64-c2vnq --namespace=kube-system
参考文章
- Installing kubeadm | kubernetes.io
- Creating a single master cluster with kubeadm | kubernetes.io
- 《Kubernetes 从上手到实践》| 掘金小册
- Running kubeadm without an internet connection | kubernetes.io
- kubeadm config image 阿里云镜像 | 简书
- 如何成功启动 Docker 自带的 Kubernetes?| 简书
- kubernetes 1.11 集群痛苦搭建过程 | Mr.Cai
- Kubeadm 安装 Kubernetes 环境 | ericnie 的技术博客(RedHat 工程师)
- Kubernetes的 node NotReady 如何查问题,针对问题解决 | CSDN
- Kubernetes 初体验 | 时间轨迹
- Minikube - Kubernetes本地实验环境 | 阿里云栖社区
- 使用 minikube 安装 k8s 集群 | 胡伟煌
- kubeadm 续坑篇 | 漠然

