Go Web Programming Notes. To Be Updated…

1. 快速开始
package main

import (
    "fmt"
    "net/http"
)

func handler(writer http.ResponseWriter, request *http.Request) {
    fmt.Fprintf(writer, "Hello Web, %s!", request.URL.Path[1:])
}

func main() {
    http.HandleFunc("/", handler)
    http.ListenAndServe(":8080", nil)
}
HTTP 请求的 URL 格式:
http://<servername>/<handlername>?<parameters>
2. HttpRouter
相关参考:
- 08.3. REST - Go Web 编程 | Learnku
- httprouter - julienschmidt | Github
- build-web-application-with-golang - astaxie | Github
package main

import (
    "fmt"
    "log"
    "net/http"

    "github.com/julienschmidt/httprouter"
)

func Index(w http.ResponseWriter, r *http.Request, _ httprouter.Params) {
    fmt.Fprint(w, "Welcome!\n")
}

func Hello(w http.ResponseWriter, r *http.Request, ps httprouter.Params) {
    fmt.Fprintf(w, "hello %s!\n", ps.ByName("name"))

}

func getUser(w http.ResponseWriter, r *http.Request, ps httprouter.Params) {
    uid := ps.ByName("uid")

    fmt.Fprintf(w, "you are get user %s", uid)
}

func modifyUser(w http.ResponseWriter, r *http.Request, ps httprouter.Params) {
    uid := ps.ByName("uid")
    fmt.Fprintf(w, "you are modify user %s", uid)
}

func deleteUser(w http.ResponseWriter, r *http.Request, ps httprouter.Params) {
    uid := ps.ByName("uid")
    fmt.Fprintf(w, "you are delete user %s", uid)
}

func addUser(w http.ResponseWriter, r *http.Request, ps httprouter.Params) {
    uid := ps.ByName("uid")
    fmt.Fprintf(w, "you are add user %s", uid)
}

func main() {
    router := httprouter.New()
    router.GET("/", Index)
    router.GET("/hello/:name", Hello)

    router.GET("/user/:uid", getUser)
    router.POST("/adduser/:uid", addUser)
    router.DELETE("/deluser/:uid", deleteUser)
    router.PUT("/moduser/:uid", modifyUser)

    log.Fatal(http.ListenAndServe(":8080", router))
}
3. http 包建立 Web 服务器
参见 3.2 Go 搭建一个 Web 服务器 - build-web-application-with-golang | Github
package main

import (
    "fmt"
    "log"
    "net/http"
    "strings"
)

func sayHelloName(w http.ResponseWriter, r *http.Request) {
    r.ParseForm()

    fmt.Println(r.Form)             // 解析参数,默认是不会解析的
    fmt.Println("path", r.URL.Path) // 在服务器端打印
    fmt.Println("scheme", r.URL.Scheme)
    fmt.Println(r.Form["url_long"])

    for k, v := range r.Form {
        fmt.Println("key:", k)
        fmt.Println("val:", strings.Join(v, ""))
    }

    fmt.Fprintf(w, "Hello Abel!") // 写入到 Response 中
}

func main() {
    http.HandleFunc("/", sayHelloName)           // 设置访问的路由
    log.Fatal(http.ListenAndServe(":8080", nil)) // 设置监听的端口
}
GET请求:
GET http://localhost:8080?url_long=111&url_long=222 HTTP/1.1
响应:
HTTP/1.1 200 OK
Date: Mon, 02 Sep 2019 10:24:36 GMT
Content-Length: 11
Content-Type: text/plain; charset=utf-8
Connection: close

Hello Abel!
服务端输出:
> go run main.go

map[url_long:[111 222]]
path /
scheme
[111 222]
key: url_long
val: 111222
4. Go 如何使得 Web 工作
4.1 基本概念
先理清几个基本概念:
- Request:用户请求的信息,用来解析用户的请求信息,包括
POST、GET、Cookie、URL等信息 - Response:服务器需要反馈给客户端的信息
- Conn:用户每次的请求连接
- Handler:处理请求和生成返回信息的处理逻辑
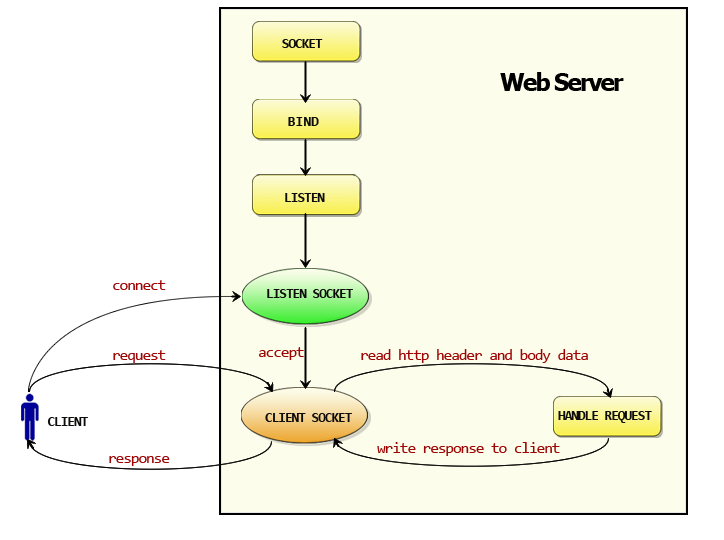
下图是 Go 实现 Web 服务的工作模式流程图:
4.2 HTTP 包的执行流程
HTTP 包的执行流程:
- 创建
Listen Socket,监听指定端口,等待客户端请求的到来 Listen Socket接收客户端的请求,得到Client Socket,接下来通过Client Socket与客户端通信- 处理客户端的请求,首先从
Client Socket读取 HTTP 请求的协议头,如果是POST方法,还可能要读取客户端提交的数据,然后交给相应的handler处理请求。处理完毕后,handler会准备好客户端需要的数据,通过Client Socket写给客户端
对于上述过程,要想了解 Go 是如何让 Web 运行起来的,需要搞清楚以下三点:
- 如何监听端口?
- 如何接收客户端请求?
- 如何分配 handler?
4.3 如何监听端口?
Go Version:
1.12.6
在之前的代码中可以看到,监听端口的实现是在http.ListenAndServe()函数中:
http.ListenAndServe(":8080", nil)
该函数首先会初始化一个Server对象,之后调用该对象的同名方法:
// ListenAndServe listens on the TCP network address addr and then calls
// Serve with handler to handle requests on incoming connections.
// Accepted connections are configured to enable TCP keep-alives.
//
// The handler is typically nil, in which case the DefaultServeMux is used.
//
// ListenAndServe always returns a non-nil error.
func ListenAndServe(addr string, handler Handler) error {
    server := &Server{Addr: addr, Handler: handler}
    return server.ListenAndServe()
}
Server结构体的ListenAndServe()方法又调用了net.Listen("tcp", addr),也就是底层用 TCP 协议搭建了一个服务,开始监听指定的端口:
// ListenAndServe listens on the TCP network address srv.Addr and then
// calls Serve to handle requests on incoming connections.
// Accepted connections are configured to enable TCP keep-alives.
//
// If srv.Addr is blank, ":http" is used.
//
// ListenAndServe always returns a non-nil error. After Shutdown or Close,
// the returned error is ErrServerClosed.
func (srv *Server) ListenAndServe() error {
    if srv.shuttingDown() {
        return ErrServerClosed
    }
    addr := srv.Addr
    if addr == "" {
        addr = ":http"
    }
    ln, err := net.Listen("tcp", addr) // 监听指定的端口
    if err != nil {
        return err
    }
    // 接收并处理客户端的请求
    return srv.Serve(tcpKeepAliveListener{ln.(*net.TCPListener)})
}
4.4 如何接收客户端请求?
监听端口之后,上述代码最后又调用了srv.Serve(tcpKeepAliveListener{ln.(*net.TCPListener)})作为返回值,该函数的作用就是接收并处理客户端的请求信息。该函数的具体实现如下:
// Serve accepts incoming connections on the Listener l, creating a
// new service goroutine for each. The service goroutines read requests and
// then call srv.Handler to reply to them.
//
// HTTP/2 support is only enabled if the Listener returns *tls.Conn
// connections and they were configured with "h2" in the TLS
// Config.NextProtos.
//
// Serve always returns a non-nil error and closes l.
// After Shutdown or Close, the returned error is ErrServerClosed.
func (srv *Server) Serve(l net.Listener) error {
    // 省略部分代码
    for {
        rw, e := l.Accept() // 1. 接收客户端请求
        if e != nil {
            select {
            case <-srv.getDoneChan():
                return ErrServerClosed
            default:
            }
            if ne, ok := e.(net.Error); ok && ne.Temporary() {
                if tempDelay == 0 {
                    tempDelay = 5 * time.Millisecond
                } else {
                    tempDelay *= 2
                }
                if max := 1 * time.Second; tempDelay > max {
                    tempDelay = max
                }
                srv.logf("http: Accept error: %v; retrying in %v", e, tempDelay)
                time.Sleep(tempDelay)
                continue
            }
            return e
        }
        tempDelay = 0
        c := srv.newConn(rw) // 2. 创建一个新的 Conn
        c.setState(c.rwc, StateNew) // before Serve can return
        go c.serve(ctx)      // 3. 为每个连接单独开一个 goroutine
    }
}
省略部分代码,重点关注其中的for{}循环:
l.Accept():接收请求,并处理可能出现的错误srv.newConn(rw):创建一个新的连接Conngo c.serve(ctx):为新连接单独开一个goroutine,把请求的数据当作参数扔给这个Conn去服务
4.5 如何分配 handler?
那么如何具体分配到相应的函数来处理请求呢?可以看到,在上面的代码中,最后实际调用go c.serve(ctx)处理请求,该函数的实现代码较长,仅截取重要语句如下:
// Serve a new connection.
func (c *conn) serve(ctx context.Context) {
    // 省略部分代码
    for {
        // 1. 解析请求,获取 ResponseWriter 及 Request
        w, err := c.readRequest(ctx)

        // 省略部分代码

        // HTTP cannot have multiple simultaneous active requests.[*]
        // Until the server replies to this request, it can't read another,
        // so we might as well run the handler in this goroutine.
        // [*] Not strictly true: HTTP pipelining. We could let them all process
        // in parallel even if their responses need to be serialized.
        // But we're not going to implement HTTP pipelining because it
        // was never deployed in the wild and the answer is HTTP/2.

        // 2. 进一步处理请求
        serverHandler{c.server}.ServeHTTP(w, w.req)
    }
    // 省略部分代码
}
c.readRequest(ctx):解析请求,获取对应的ResponseWriter及RequestserverHandler.ServeHTTP(w, w.req):进一步处理请求
结构体serverHandler的ServeHTTP()方法具体实现如下:
func (sh serverHandler) ServeHTTP(rw ResponseWriter, req *Request) {
    // 1. 获取 Server 对应的 Handler
    handler := sh.srv.Handler

    // 2. 若对应的 Handler 为 nil,则使用 DefaultServeMux
    if handler == nil {
        handler = DefaultServeMux
    }
    if req.RequestURI == "*" && req.Method == "OPTIONS" {
        handler = globalOptionsHandler{}
    }

    // 3. 调用相应的函数处理请求
    handler.ServeHTTP(rw, req)
}
首先通过handler := sh.srv.Handler获取对应的Handler,也就是最开始调用ListenAndServe()时传入的第二个参数。实际上Handler是一个接口类型,只定义了一个方法ServeHTTP():
type Handler interface {
    ServeHTTP(ResponseWriter, *Request)
}
例如之前传入的参数是nil,就会使用默认的DefaultServeMux。该变量是一个路由器(或者说,HTTP 请求多路复用器),用来匹配 URL 并跳转到其相应的 handle 函数,它在 Go 源码的server.go中定义:
// ServeMux is an HTTP request multiplexer.
// It matches the URL of each incoming request against a list of registered
// patterns and calls the handler for the pattern that
// most closely matches the URL.
//
// Patterns name fixed, rooted paths, like "/favicon.ico",
// or rooted subtrees, like "/images/" (note the trailing slash).
// Longer patterns take precedence over shorter ones, so that
// if there are handlers registered for both "/images/"
// and "/images/thumbnails/", the latter handler will be
// called for paths beginning "/images/thumbnails/" and the
// former will receive requests for any other paths in the
// "/images/" subtree.
//
// Note that since a pattern ending in a slash names a rooted subtree,
// the pattern "/" matches all paths not matched by other registered
// patterns, not just the URL with Path == "/".
//
// If a subtree has been registered and a request is received naming the
// subtree root without its trailing slash, ServeMux redirects that
// request to the subtree root (adding the trailing slash). This behavior can
// be overridden with a separate registration for the path without
// the trailing slash. For example, registering "/images/" causes ServeMux
// to redirect a request for "/images" to "/images/", unless "/images" has
// been registered separately.
//
// Patterns may optionally begin with a host name, restricting matches to
// URLs on that host only. Host-specific patterns take precedence over
// general patterns, so that a handler might register for the two patterns
// "/codesearch" and "codesearch.google.com/" without also taking over
// requests for "http://www.google.com/".
//
// ServeMux also takes care of sanitizing the URL request path and the Host
// header, stripping the port number and redirecting any request containing . or
// .. elements or repeated slashes to an equivalent, cleaner URL.
type ServeMux struct {
    mu    sync.RWMutex
    m     map[string]muxEntry
    es    []muxEntry // slice of entries sorted from longest to shortest.
    hosts bool       // whether any patterns contain hostnames
}

type muxEntry struct {
    h       Handler
    pattern string
}

// NewServeMux allocates and returns a new ServeMux.
func NewServeMux() *ServeMux { return new(ServeMux) }

// DefaultServeMux is the default ServeMux used by Serve.
var DefaultServeMux = &defaultServeMux

var defaultServeMux ServeMux
最开始在main()函数中调用http.HandleFunc("/", sayHelloName)时,就注册了请求/的路由规则:
func main() {
    http.HandleFunc("/", sayHelloName)           // 设置访问的路由
    log.Fatal(http.ListenAndServe(":8080", nil)) // 设置监听的端口
}

// HandleFunc registers the handler function for the given pattern
// in the DefaultServeMux.
// The documentation for ServeMux explains how patterns are matched.
func HandleFunc(pattern string, handler func(ResponseWriter, *Request)) {
    DefaultServeMux.HandleFunc(pattern, handler)
}
这样一来当请求的 URI 为/时,路由就会跳转到/对应的Handler,也就是sayHelloName()本身,最后把结果写入 Response 并反馈给客户端。
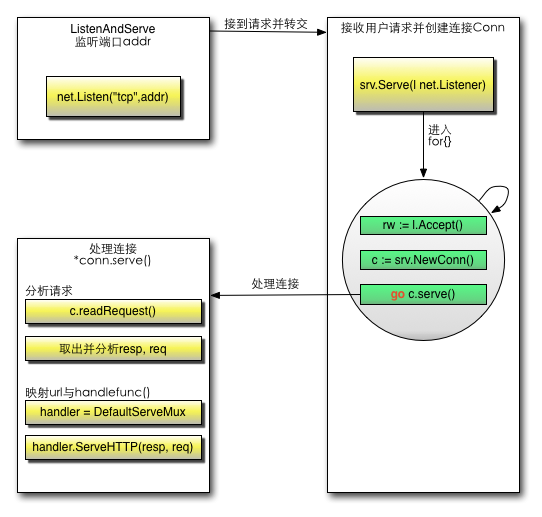
4.6 HTTP 连接的处理流程
一个 HTTP 连接的处理流程示意图如下:
5. Go 的 http 包详解
参见 3.4 Go 的 http 包详解 - build-web-application-with-golang | Github
Go 的http包有两个核心功能:Conn、ServeMux。
5.1 Conn 的 goroutine
与其他一些语言编写的 HTTP 服务器不同,Go 为了实现高并发和高性能,使用了goroutine来处理Conn的读写事件,这样每个请求都能保持独立,相互不会阻塞,可以高效的响应网络事件,这是 Go 高效的保证。
Go 在等待客户端请求的Serve()函数里是这样写的:
func (srv *Server) Serve(l net.Listener) error {
    // 省略部分代码
    for {
        rw, e := l.Accept()

        // 省略错误处理

        c := srv.newConn(rw)
        c.setState(c.rwc, StateNew) // before Serve can return
        go c.serve(ctx)
    }
}
可以看到客户端的每次请求都会创建一个Conn,函数newConn()在server.go中的实现如下:
// Create new connection from rwc.
func (srv *Server) newConn(rwc net.Conn) *conn {
    c := &conn{
        server: srv,
        rwc:    rwc,
    }
    if debugServerConnections {
        c.rwc = newLoggingConn("server", c.rwc)
    }
    return c
}
可以看到Conn实际上在net包中定义,是一个接口类型,在net.go中的定义如下:
// Conn is a generic stream-oriented network connection.
//
// Multiple goroutines may invoke methods on a Conn simultaneously.
type Conn interface {
    Read(b []byte) (n int, err error)
    Write(b []byte) (n int, err error)
    Close() error

    LocalAddr() Addr
    RemoteAddr() Addr

    SetDeadline(t time.Time) error
    SetReadDeadline(t time.Time) error
    SetWriteDeadline(t time.Time) error
}
客户端的每次请求都会创建一个
Conn,这个Conn里面保存了该次请求的信息,然后再传递到对应的handler,该handler中便可以读取到相应的 Header 信息,这样就保证了每个请求的独立性
5.2 ServeMux 的自定义
之前调用http.ListenAndServe(":8080", nil)时,实际上内部时调用了http包默认的路由器DefaultServeMux,通过路由器把本次请求的信息传递到了后端的处理函数,它是一个ServeMux类型的变量:
// DefaultServeMux is the default ServeMux used by Serve.
var DefaultServeMux = &defaultServeMux

var defaultServeMux ServeMux
结构体ServeMux就是 Go 中的路由器,它在server.go中的定义如下:
type ServeMux struct {
    // 锁,由于请求涉及到并发处理,因此这里需要一个锁机制
    mu    sync.RWMutex
    // 路由规则,一个路由表达式 string 对应一个 muxEntry 实体
    m     map[string]muxEntry
    es    []muxEntry // slice of entries sorted from longest to shortest.
    // 是否在任意的规则中带有 host 信息
    hosts bool       // whether any patterns contain hostnames
}

type muxEntry struct {
    h       Handler // 路由表达式对应哪个 handler
    pattern string  // 路径匹配字符串
}

type Handler interface {
    ServeHTTP(ResponseWriter, *Request) // 路由实现器
}
Handler是一个接口,但是之前示例代码中的sayHelloName()函数并没有实现ServeHTTP()这个方法,为什么能作为 Handler 添加到路由器中呢?
这是因为在http包中还定义了一个类型HandlerFunc,回顾一下之前设置访问路由的语句:
http.HandleFunc("/", sayHelloName)
这里我们调用了HandleFunc()将sayHelloName()设置为"/"路由对应的Handler,而HandleFunc()实际进行的操作如下:
// HandleFunc registers the handler function for the given pattern.
func (mux *ServeMux) HandleFunc(pattern string, handler func(ResponseWriter, *Request)) {
    if handler == nil {
        panic("http: nil handler")
    }
    mux.Handle(pattern, HandlerFunc(handler))
}
可以看到这里将handler转换为了HandlerFunc,而它默认实现了ServeHTTP()方法,即我们调用了HandlerFunc(f),将f强制类型转换为HandlerFunc类型,这样f就拥有了ServeHTTP()方法:
这也是适配器模式在 Go 中的应用
// The HandlerFunc type is an adapter to allow the use of
// ordinary functions as HTTP handlers. If f is a function
// with the appropriate signature, HandlerFunc(f) is a
// Handler that calls f.
type HandlerFunc func(ResponseWriter, *Request)

// ServeHTTP calls f(w, r).
func (f HandlerFunc) ServeHTTP(w ResponseWriter, r *Request) {
    f(w, r)
}
路由器里存储好了相应的路由规则,那么具体的请求又是怎样分发的呢?实际上,默认的路由器ServeMux实现了ServeHTTP()方法:
// ServeHTTP dispatches the request to the handler whose
// pattern most closely matches the request URL.
func (mux *ServeMux) ServeHTTP(w ResponseWriter, r *Request) {
    if r.RequestURI == "*" {
        if r.ProtoAtLeast(1, 1) {
            w.Header().Set("Connection", "close")
        }
        w.WriteHeader(StatusBadRequest)
        return
    }
    h, _ := mux.Handler(r)
    h.ServeHTTP(w, r)
}
如上所示,路由器接收到请求之后,如果是*则关闭连接,否则会调用mux.Handler(r)返回对应设置路由的处理 handler,然后执行h.ServeHTTP(w, r),也就是调用对应路由的 handler 的ServeHTTP接口。
继续来看mux.Handler(r)是如何处理的:
func (mux *ServeMux) Handler(r *Request) (h Handler, pattern string) {

    // CONNECT requests are not canonicalized.
    if r.Method == "CONNECT" {
        // If r.URL.Path is /tree and its handler is not registered,
        // the /tree -> /tree/ redirect applies to CONNECT requests
        // but the path canonicalization does not.
        if u, ok := mux.redirectToPathSlash(r.URL.Host, r.URL.Path, r.URL); ok {
            return RedirectHandler(u.String(), StatusMovedPermanently), u.Path
        }

        return mux.handler(r.Host, r.URL.Path)
    }

    // 省略部分代码

    return mux.handler(host, r.URL.Path)
}

// handler is the main implementation of Handler.
// The path is known to be in canonical form, except for CONNECT methods.
func (mux *ServeMux) handler(host, path string) (h Handler, pattern string) {
    mux.mu.RLock()
    defer mux.mu.RUnlock()

    // Host-specific pattern takes precedence over generic ones
    if mux.hosts {
        h, pattern = mux.match(host + path)
    }
    if h == nil {
        h, pattern = mux.match(path)
    }
    if h == nil {
        h, pattern = NotFoundHandler(), ""
    }
    return
}
可以看到在mux.handler()中是调用mux.match()进行匹配的,函数定义如下:
// Find a handler on a handler map given a path string.
// Most-specific (longest) pattern wins.
func (mux *ServeMux) match(path string) (h Handler, pattern string) {
    // Check for exact match first.
    v, ok := mux.m[path]
    if ok {
        return v.h, v.pattern
    }

    // Check for longest valid match.  mux.es contains all patterns
    // that end in / sorted from longest to shortest.
    for _, e := range mux.es {
        if strings.HasPrefix(path, e.pattern) {
            return e.h, e.pattern
        }
    }
    return nil, ""
}
这样一来就清楚了,在match()方法中,会根据mux.m[path]获取请求路径对应的muxEntry,返回muxEntry中保存的Handler以及pattern字符串,最后调用Handler的ServeHTTP()方法就可以执行相应的函数了。
5.3 外部实现自定义路由
通过上面的介绍,我们大致了解了 Go 的整个路由过程。除了默认路由器DefaultServeMux,Go 同时也支持外部实现的路由器。
http.ListenAndServe()方法的第二个参数就是用来配置外部路由器的,它是一个Handler接口,即外部路由器只要实现了Handler接口的ServeHTTP()方法,就可以在自己实现的路由器的ServeHTTP()中实现自定义路由功能。
如下所示,实现一个简单的外部路由器MyMux:
package main

import (
    "fmt"
    "net/http"
)

type MyMux struct {
}

func (p *MyMux) ServeHTTP(w http.ResponseWriter, r *http.Request) {
    if r.URL.Path == "/" {
        sayHelloName(w, r)
        return
    }
    http.NotFound(w, r)
    return
}

func sayHelloName(w http.ResponseWriter, r *http.Request) {
    fmt.Fprintf(w, "Hello My Router!")
}

func main() {
    mux := &MyMux{}
    http.ListenAndServe(":8080", mux)
}
请求报文:
GET http://localhost:8080 HTTP/1.1
响应报文:
HTTP/1.1 200 OK
Date: Tue, 03 Sep 2019 02:57:42 GMT
Content-Length: 16
Content-Type: text/plain; charset=utf-8
Connection: close

Hello My Router!
5.4 Go 代码的执行流程
Go Version:
1.12.6
分析完http包后,现在梳理一下代码的执行过程。例如下面这段代码:
package main

import (
    "fmt"
    "net/http"
)

func index(w http.ResponseWriter, r *http.Request) {
    fmt.Fprintf(w, "Hello %s!\n", r.URL.Path[1:])
}

func main() {
    http.HandleFunc("/", index)
    http.ListenAndServe(":8080", nil)
}
首先调用http.HandleFunc():
http.HandleFunc("/", index)
 └─ DefaultServeMux.HandleFunc(pattern, handler)  // 若 handler 为 nil,则触发 panic
     └─ mux.Handle(pattern, HandlerFunc(handler)) // 注册路由
- 调用
DefaultServeMux.HandleFunc() - 调用
DefaultServeMux.Handle(),注册请求路径所对应的 handler - 在
DefaultServeMux的map[string]muxEntry中增加对应的 handler 和路由规则
之后调用http.ListenAndServe(":8080", nil):
http.ListenAndServe(":8080", nil)
 ├─ server := &Server{Addr: addr, Handler: handler}
 └─ server.ListenAndServe()
     ├─ net.Listen("tcp", addr)
     └─ srv.Serve(tcpKeepAliveListener{ln.(*net.TCPListener)})
         ├─ l.Accept()
         ├─ c := srv.newConn(rw)
         └─ go c.serve(ctx)
             ├─ w, err := c.readRequest(ctx)
             └─ serverHandler{c.server}.ServeHTTP(w, w.req)
                 ├─ handler := sh.srv.Handler // nil 则为 DefaultServeMux
                 └─ handler.ServeHTTP(rw, req)
                     ├─ h, _ := mux.Handler(r)
                     └─ h.ServeHTTP(w, r)
- 实例化
Server - 调用
server.ListenAndServe() - 调用
net.Listen("tcp", addr)监听端口,即Listen - 调用
srv.Serve()处理请求,即Serve - 在
Serve()中启动一个 for 循环,在循环中调用Accept()接收请求 - 为每个请求实例化一个
Conn,开启一个 goroutine 并调用go c.serve(ctx),为这个请求进行服务 - 调用
c.readRequest(ctx)读取每个请求内容 - 判断 handler 是否为空,如果为
nil则设为DefaultServeMux - 调用
handler.ServeHTTP(rw, req),上面的例子中就进入到DefaultServeMux.ServeHTTP(rw, req) - 根据 Request 选择 handler,并进入到这个 handler 的
ServeHTTP()中
选择 handler:
- 循环遍历
ServeMux的muxEntry,判断是否有路由能满足这个 Request - 如果有路由满足,则调用这个路由 handler 的
ServeHTTP() - 如果没有路由满足,则调用
NotFoundHandler的ServeHTTP()
6. 表单
6.1 处理表单的输入
例如下面的表单login.gtpl:
<html>

<head>
    <title></title>
</head>

<body>
    <form action="/login" method="post">
        用户名:<input type="text" name="username">
        密码:<input type="password" name="password">
        <input type="submit" value="登录">
    </form>
</body>

</html>
处理表单:
package main

import (
    "fmt"
    "html/template"
    "log"
    "net/http"
    "strings"
)

func sayHelloName(w http.ResponseWriter, r *http.Request) {
    r.ParseForm() // 解析 URL 传递的参数,对于 POST 则解析 Request Body

    // 注意:如果没有调用 ParseForm 方法,下面无法获取表单的数据
    log.Println("Inside sayHelloName")
    fmt.Printf("Form:\t%v\n", r.Form)
    fmt.Printf("path:\t%s\n", r.URL.Path)
    fmt.Printf("scheme:\t%s\n", r.URL.Scheme)
    fmt.Println(r.Form["url_long"])
    for k, v := range r.Form {
        fmt.Println("key:", k)
        fmt.Println("val:", strings.Join(v, ""))
    }
    fmt.Fprintf(w, "Hello abel!\n")
}

func login(w http.ResponseWriter, r *http.Request) {
    fmt.Println("method:", r.Method) // 获取请求的方法
    if r.Method == "GET" {
        t, _ := template.ParseFiles("login.gtpl")
        log.Println(t.Execute(w, nil))
    } else {
        // 请求的是登录数据,那么执行登录的逻辑判断
        r.ParseForm()
        fmt.Println("username:", r.Form["username"])
        fmt.Println("password:", r.Form["password"])
    }
}

func main() {
    http.HandleFunc("/", sayHelloName)
    http.HandleFunc("/login", login)
    log.Fatal(http.ListenAndServe(":8080", nil))
}
request.Form是一个url.Values类型,里面存储了key=value的信息:
package main

import (
    "fmt"
    "net/url"
)

func main() {
    v := url.Values{}
    v.Set("name", "abel")
    v.Add("friend", "arjen")
    v.Add("friend", "frank")

    fmt.Println(v.Encode())
    fmt.Println(v.Get("name"))
    fmt.Println(v.Get("friend"))
    fmt.Println(v["friend"])
}

------
friend=arjen&friend=frank&name=abel
abel
arjen
[arjen frank]
7. 访问数据库
8. Session 和数据存储
9. 文本文件处理
9.1 XML 处理
参考资料
文章教程
- Go Web Programming - sausheong | Github
- 08.3. REST - Go Web 编程 | Learnku
- httprouter - julienschmidt | Github
- build-web-application-with-golang - astaxie | Github
- Golang: Building a Basic Web Server in Go | Ruan Bekker’s Blog
- project-layout - Standard Go Project Layout | Github
- Go Developer Roadmap - Go 开发者路线图 | Github
- 明白了,原来 Go Web 框架中的中间件都是这样实现的 | 鸟窝
- Go 语言的修饰器编程 | 酷壳 CoolShell
- 教程:使用 go 的 gin 和 gorm 框架来构建 RESTful API 微服务 | LearnKu
- Build RESTful API service in golang using gin-gonic framework | Medium
RESTful
- RESTful API 设计指南 | 阮一峰
- RESTful API 最佳实践 | 阮一峰
- RESTful API 规范 | RyuGou
- 如何给老婆解释什么是Restful | Java3y
- 对比 RESTful 与 SOAP,深入理解 RESTful | 紫川秀的博客
- RESTful API 设计规范 | 紫川秀的博客
- 如何使用 swagger 设计出漂亮的 RESTful API | 紫川秀的博客
- Go 学习笔记 (六) - 使用 swaggo 自动生成 Restful API 文档 | Razeen’s Blog
Mock API
RPC
数据加密
- 密码学简介与 Golang 的加密库 Crypto 的使用 | 紫川秀的博客
- 加密和解密数据 - Go Web 编程 | LearnKu
- 常见的加密算法 | Go 语言中文网
- Golang 常用加密解密算法总结 (AES、DES、RSA、Sha1MD5) | CSDN

